


By Ishan Shah, Rekhit Pachanekar and Gaurav Singh
Pre-requisite blogs:
Stage of this weblog: Basis/Newbie
Technical indicators are calculated utilizing historic value and quantity knowledge to foretell the market course. These indicators are added on charts utilizing which you’ll set your entry and exit alerts.
Gained’t it’s superb if you happen to can compute these technical indicators in python in a couple of traces of code and backtest the efficiency of it on many monetary securities?
What began off as a pastime by Mario Fortier, Ta-Lib python library shortly rose to turn into one of the well-known libraries for technical evaluation of shares and different monetary securities. Ta-lib consists of 150+ indicators comparable to ADX, MACD, RSI and Bollinger Bands and candlestick sample recognition.
Nevertheless, it’s tough and typically irritating to put in Ta-Lib in your python. However don’t fear, on this article, we’ll simplify the set up for you so that you could concentrate on creating and backtesting methods.
We’ll cowl the next matters on this Ta-Lib set up tutorial.
Earlier than we start, why was Python Ta-Lib created within the first place? Allow us to take into consideration the explanation capabilities have been made. It was realised that as an alternative of writing the identical code, we may create a operate and cut back the code size by an enormous margin. It’s the identical logic we apply to Ta-Lib. As a substitute of writing a couple of traces of code to first discover the higher and decrease bands after which the Bollinger band, we use Ta-Lib and enter only one line of code to get the outcome. That’s all! Retaining that in thoughts, allow us to start with the tutorial on Python Ta-Lib.
Simpler Methodology
Set up Ta-Lib Throughout Platforms Utilizing Anaconda Immediate
Anaconda is an open-source Python distribution platform that helps people, in addition to business enterprises, implement their Python codes simply. It additionally makes life simpler in relation to putting in varied Python libraries.
For this course of, we had created a digital surroundings with the identify “my_project”.

If you wish to create a digital surroundings which has all of the required libraries used for knowledge evaluation, you may head on over to the tutorial: Setting Up Python On Your System.
To put in Ta-Lib, you’ll first set up Anaconda after which open the Anaconda immediate.
You’d then write the code, “conda set up -c conda-forge ta-lib”, and press the “Enter” key.

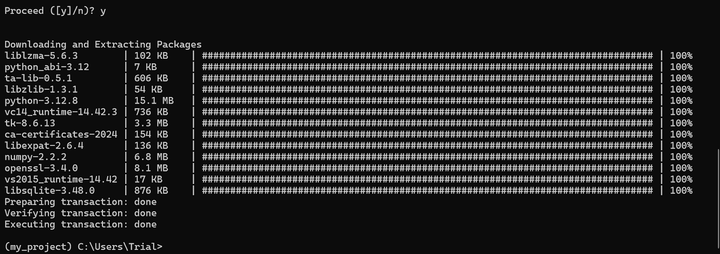
Observe: The packages are first downloaded from the respective net location. You’ll then be prompted to substantiate the set up course of by urgent “y” on the keyboard. This acts as a affirmation for the installer to put in the mandatory information.
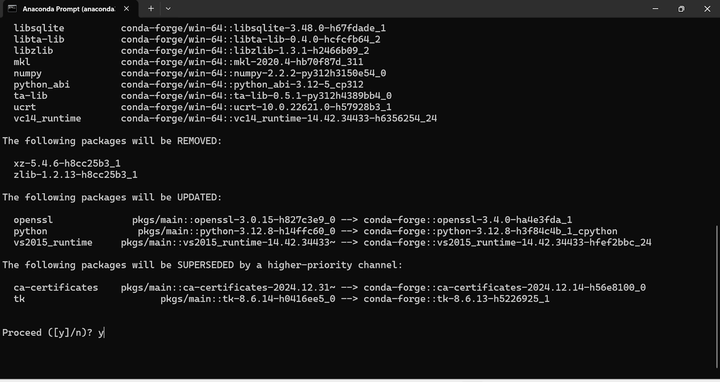
After a couple of moments, the ta-lib bundle will probably be put in.
That’s all there’s to it. More often than not this technique would assist you to set up the bundle, however if you happen to nonetheless face any issues, learn on to search out the set up directions as per the working system.
Alternate Methodology
Set up Ta-Lib on Home windows PC
Step 0: We recommend the Anaconda installer for putting in Python as it’s simpler to work with in relation to programming in Python.
Step 1: Upon getting put in Anaconda, you’ll use the Anaconda immediate window to put in the related information.
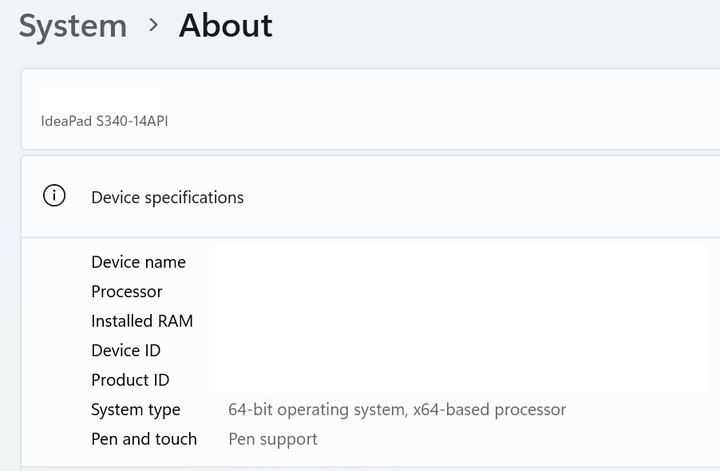
Earlier than we obtain the Python Ta-Lib information, we’ve to confirm the Python model in addition to the Home windows System structure (32-bit or 64-bit) on our laptop.
You could find the model put in in your system by merely writing the next code within the Anaconda immediate window: python –version
You’re going to get the output as proven under:

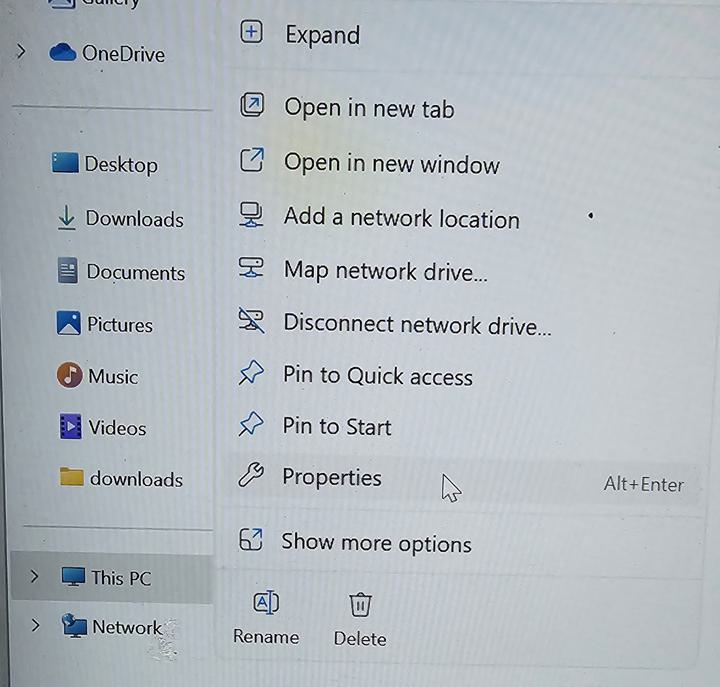
For the home windows structure, you may merely right-click in your “laptop” (normally named as “This-PC” or “My Laptop”) icon and click on properties and your system particulars will probably be displayed.
Step 2: We can’t immediately use the “pip set up” command in relation to putting in Ta-Lib. Thus, we’ll first set up the “whl” file which could be discovered on this hyperlink.
The web site is a helpful useful resource for lots of Python extensions, however we’re involved about Ta-Lib set up for now.
You’ll be able to scroll right down to the part the place we’ll discover the related hyperlinks, as proven under:
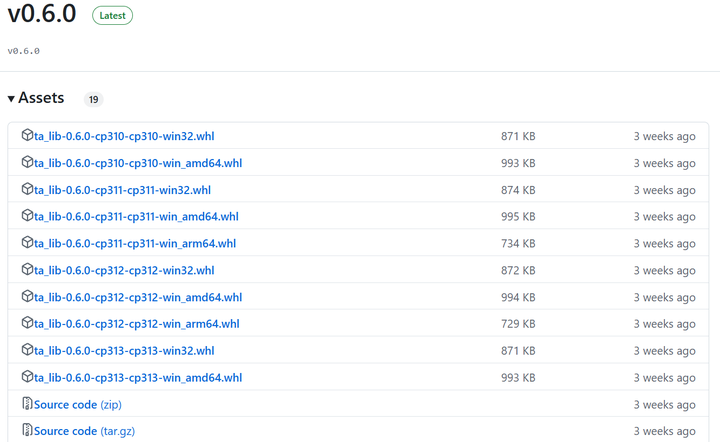
One ought to be aware that you need to obtain the file preserving your Python model and Home windows structure (32 bit or 64 bit) in thoughts. E.g. Since we’ve the python model 3.13 put in and 64 bit Home windows 11 system, we’ll obtain the file, “ta_lib-0.6.0-cp313-cp313-win_amd64.whl”.
As you may need guessed “cp313” implies Python model 3.13 and “win_amd64” implies Home windows 64 bit working system.
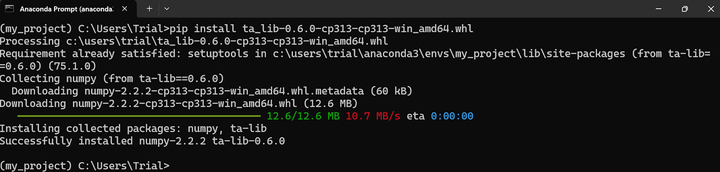
By default, the “whl” file will get downloaded within the “Downloads” folder. Since we’ve used Anaconda installer for Python, we’ll place the file in the identical folder location which is proven on the Anaconda immediate.
For eg: C:UsersTrial
And now comes the simple half.
Within the Anaconda immediate, use the pip set up command with the file identify of the downloaded file.
Since we’ve downloaded the file, “ta_lib-0.6.0-cp313-cp313-win_amd64.whl”, the command can be, pip set up ta_lib-0.6.0-cp313-cp313-win_amd64.whl
If there isn’t any error, then it implies that we’ve efficiently put in Ta-Lib. It’s best to get a display screen confirming the set up is finished.
Nice! We have now simply completed putting in the Ta-Lib Python library.
However how can we test whether it is appropriately put in?
On the Anaconda command immediate, you’ll first sort “python” to interpret this system.

We’ll then sort the next command, “import talib” after which press Enter.
If there aren’t any errors, then it implies that the python Ta-Lib library has been efficiently put in in your laptop.

Alternatively, you can too open Jupyter pocket book (or Spyder) and attempt to run the identical code to test if the Python Ta-Lib is put in appropriately.

Set up Ta-Lib on MacOS
Compared to the home windows set up, Python Ta-Lib set up is comparatively easy and simple on the MacOS. However earlier than we speak concerning the set up of Ta-Lib, we’ve to ensure the python surroundings is put in as effectively.
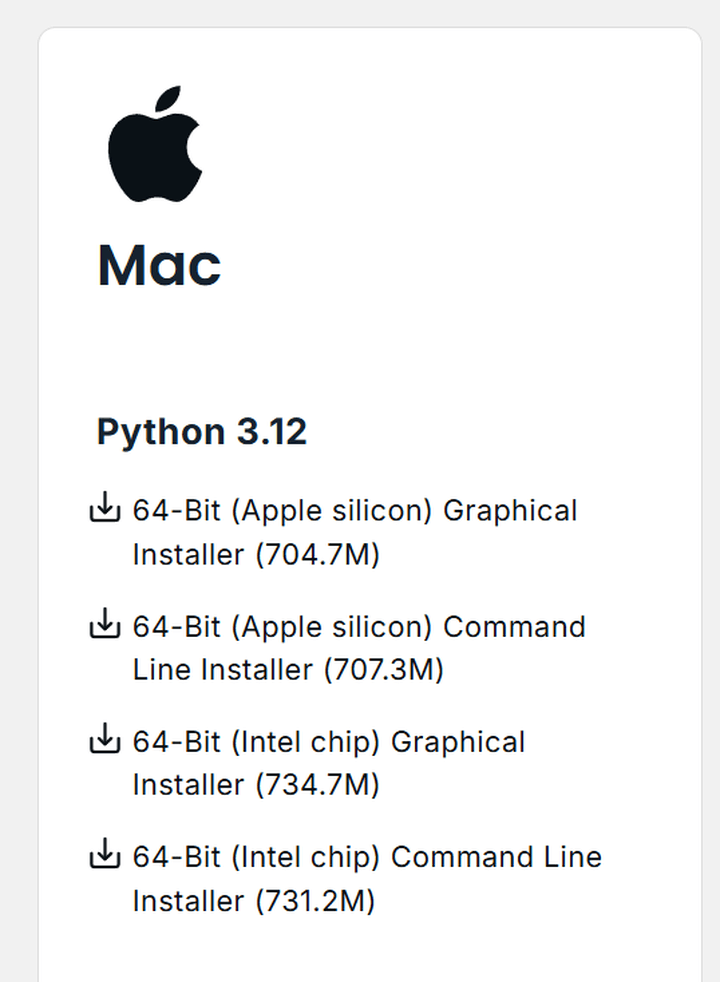
You’ll be able to set up Anaconda from the next hyperlink or obtain Python from the next hyperlink. In our opinion, it’s typically a good suggestion to put in Anaconda because it helps construct an surroundings in your python code to be executed seamlessly.
Relying on the {hardware} and OS model you may choose the related possibility for downloading the Anaconda installer.
You’ll then be greeted with the next dialog field.
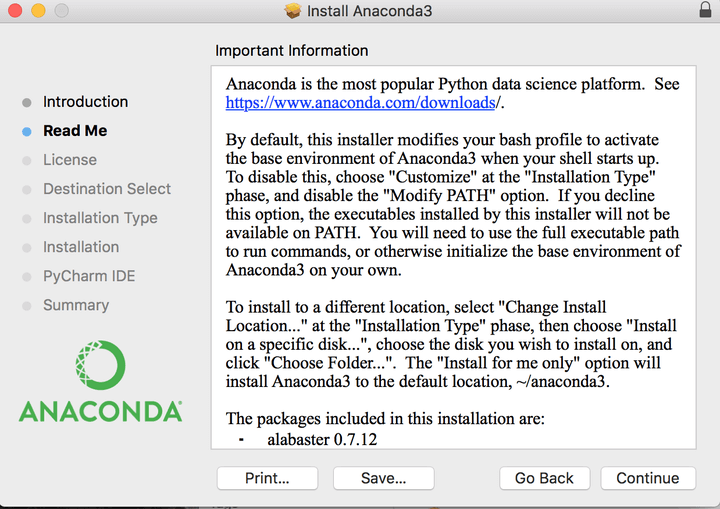
Choose “Proceed” tab and select the suitable set up vacation spot and you’ll end set up in a short while.
All proper, now we transfer on to the principle occasion, i.e. Python Ta-lib set up. Okay, there’s one small step it is advisable to do earlier than the principle set up.
Examine if you should utilize the ‘brew’ command. For this tutorial on the best way to set up Ta-Lib, allow us to assume that the ‘brew’ command throws an error. To rectify this, we set up the mandatory bundle by utilizing the next line of code within the MacOS shell:
ruby -e “$(curl -fsSL https://uncooked.githubusercontent.com/Homebrew/set up/grasp/set up)”
Whether it is profitable, you will note the next messages:
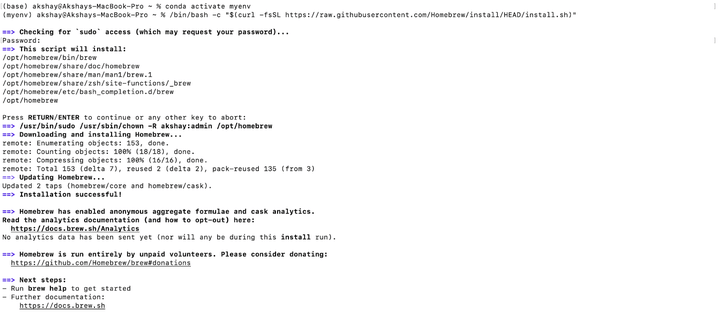
After all, you’re going to get a immediate which asks you to press “Return” to proceed the set up or another key to cancel the set up. If you’re curious concerning the ‘brew’ command, you may all the time go to the next web site to know extra.
Nice! Now that the brew command is put in, use the next code to put in the Ta-Lib working system dependencies:
You will notice the next display screen.

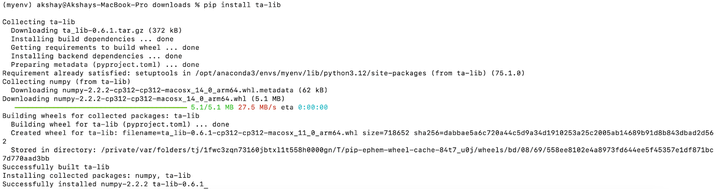
Now, we use the acquainted command i.e. “pip” to put in Ta-Lib on our MacOS. The command is as follows:
You see the next information being put in in your system.
Nice! We have now been profitable in our quest to put in Ta-Lib on MacOS.
However how can we test whether it is appropriately put in on the system? Easy, we use the next instructions.
First, we name the python language by merely writing “python” within the terminal.

We then use the next command to import the Ta-Lib library.
If there isn’t any error, then we should always be capable to see the next display screen

Set up Ta-Lib on Linux
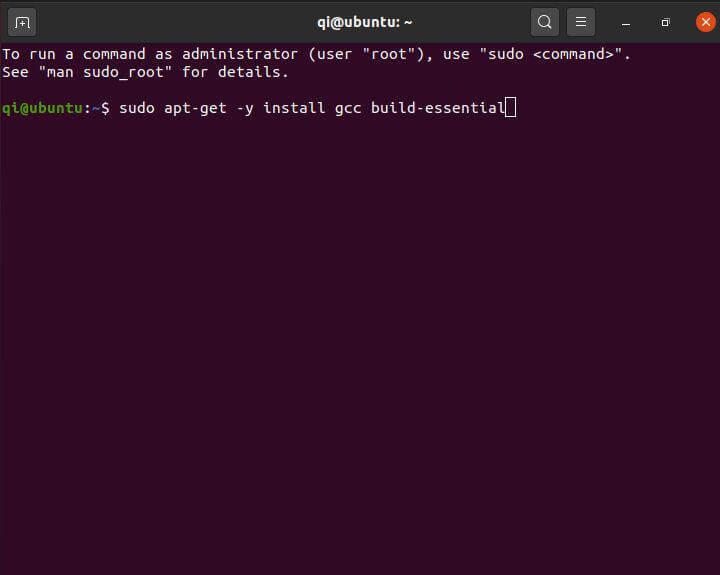
The Ta-lib set up in Linux is usually a bit tough. The libraries crucial for the Ta-lib set up needs to be put in first prior to installing the Python wrapper.
However don’t fear! We have now offered complete steps on the best way to set up the Ta-lib library in your Linux system.
Step 0: Set up Anaconda in your Linux system. You’ll be able to comply with the documentation or execute the instructions as shared under.
The next command installs the Anaconda software program and creates an surroundings named ‘quantra’. You need to use this surroundings in your Quantra associated coding initiatives!
Set up the prerequisitesInstall Anaconda in your system

Step 1: Set up the Ta-lib dependencies and Python wrapper by executing the next command.
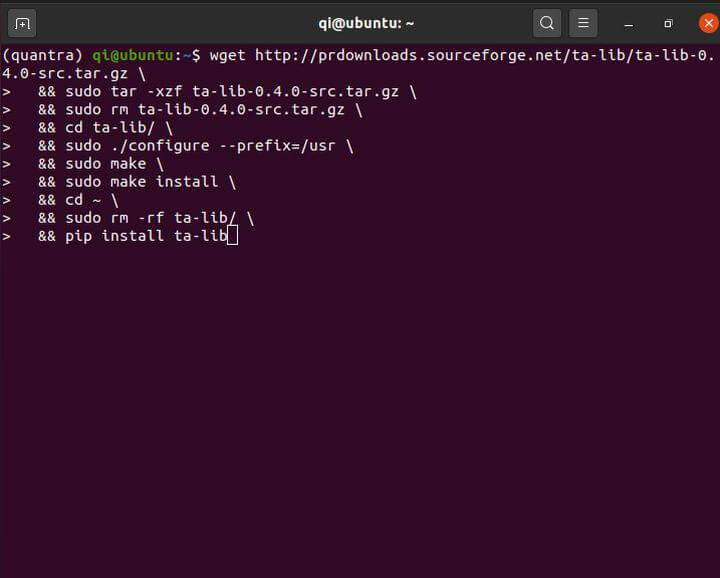
This may take a few minutes and set up all of the libraries crucial for utilizing Ta-lib.
Step 2: Take a look at the Ta-lib set up by executing a pattern script. We take some knowledge and attempt to discover the transferring common utilizing the Ta-lib libraries.
Set up yfinance library if you happen to wouldn’t have it alreadyRun Python within the terminalPaste the next code traces to test if Ta-lib is working correctly or not.It’s best to see a Easy MA and EMA column much like the screenshot under.

The Ta-lib library is now put in within the ‘quantra’ surroundings! To know the best way to activate and change environments, please discuss with the Conda useful resource right here.
Superior! We have now now been profitable in putting in Python Ta-Lib on Home windows, MacOS and Linux. However can we actually cease right here? Within the subsequent part, we strive a easy code utilizing the Ta-Lib library.
Technical Indicators utilizing Python Ta-Lib
We’ll first import the Python Ta-Lib library since we’re utilizing it to work out totally different indicators. Together with that, we use the python matplotlib to attract their graphs for evaluation. Since we’re going to be engaged on the inventory costs, we’ll import the info from Yahoo Finance.
Thus, the code will probably be as follows:
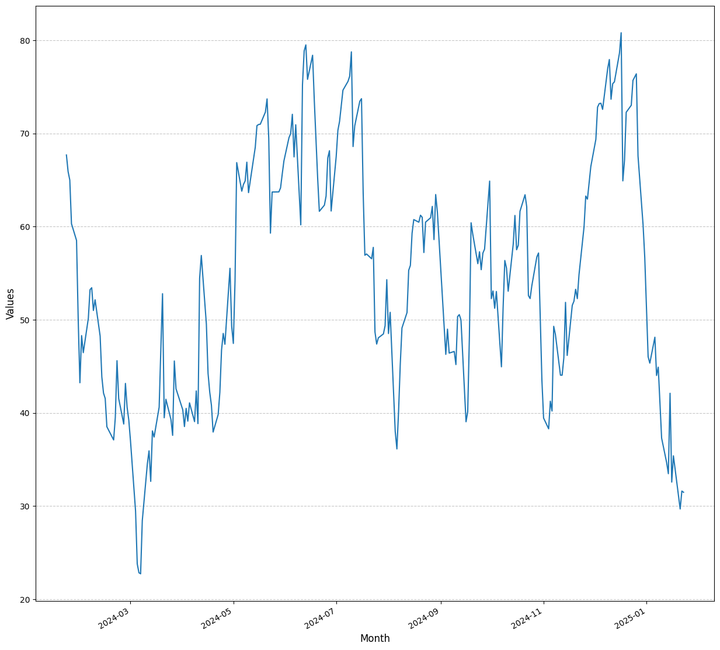
Within the above instance, we’ve imported the inventory value knowledge of Apple from 1 January 2024 to 24 January 2025.
Allow us to begin off with one thing easy. We’ll discover the Easy Transferring Common and the Exponential Transferring Common of Apple inventory knowledge. We’ll use the next code:
The output is as follows:
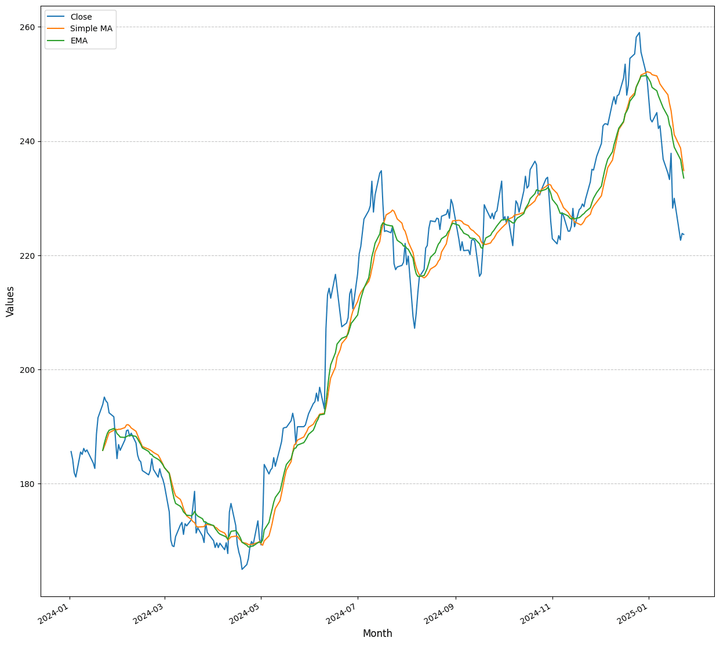
That was easy, wasn’t it?
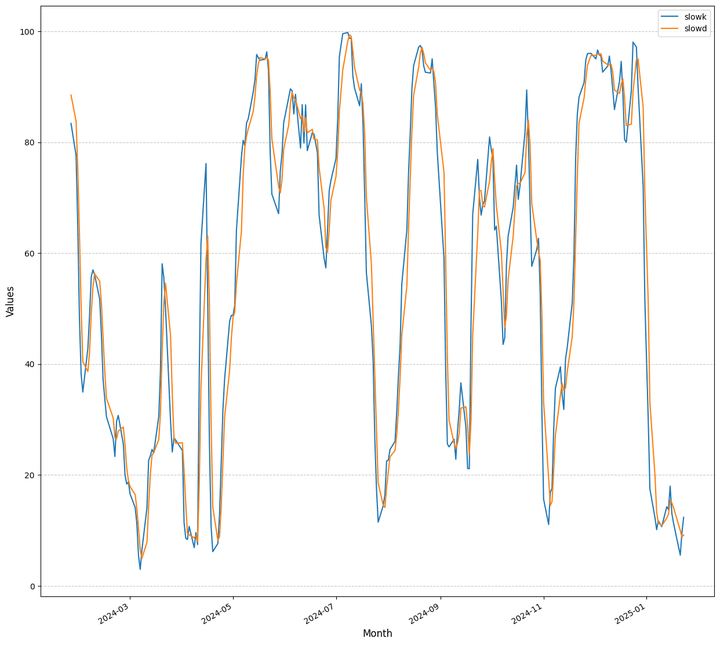
Recall that firstly of this tutorial on Putting in Python Ta-Lib, we talked about Bollinger Bands. Effectively, let’s strive that one now.
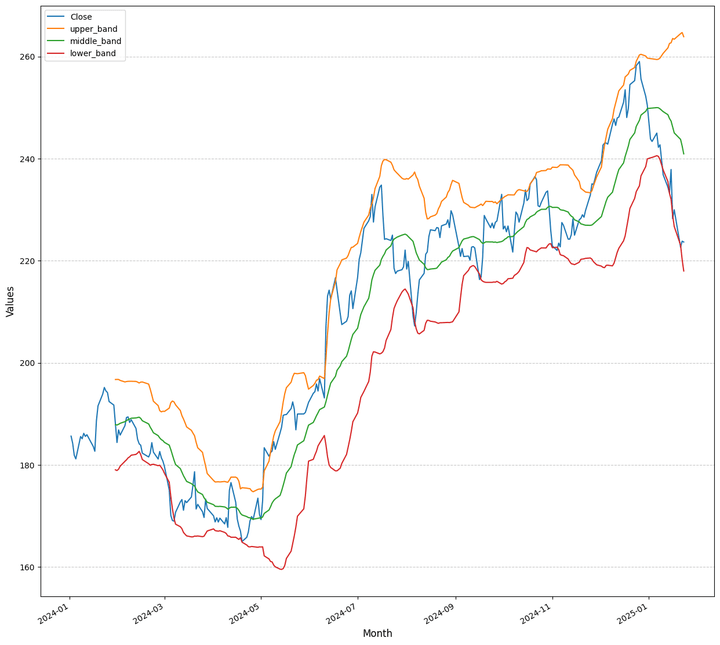
Wasn’t it straightforward? We’re certain you might be getting it however allow us to break down the road and see how Python Ta-Lib labored out the Bollinger Bands.
To create the Bollinger bands, we merely handed the Closing Value ie the “Shut” column and outlined a time interval of 20 for the transferring common. That is performed utilizing the “ta.BBANDS()” operate. Because the Bollinger bands include three bands, we retailer the info within the following three columns, “upper_band”, “middle_band” and “lower_band.
Now, can you determine from the code under, what are the parameters handed?
As a bonus, we plotted the Stochastic oscillators as effectively, the code is given under:
FAQs for TA-Lib Set up
Query: I put in TALib-0.4.21-cp37-cp37m-winamd64
Nevertheless, it provides under error.
ValueError: numpy.ndarray dimension modified, might point out binary incompatibility. Anticipated 88 from C header, obtained 80 from PyObject
Reply: The error you are encountering is because of a compatibility situation between the put in model of TA-Lib and the model of NumPy getting used.
To resolve this situation, you may strive the next steps:
Improve NumPy: Open the Anaconda immediate or terminal and execute the next command: pip set up –upgrade numpyReinstall TALib: After updating NumPy, uninstall and reinstall the present TALib set up as defined.
Conclusion
Thus, we’ve gone via the Tutorial on the best way to set up Python Ta-Lib on Home windows, MacOS in addition to Linux. We have now additionally discovered the best way to create a couple of technical indicators utilizing Ta-Lib and plot them.
If you wish to study varied elements of Algorithmic buying and selling and automatic buying and selling methods, then try the Govt Programme in Algorithmic Buying and selling (EPAT®). The course covers coaching modules like Statistics & Econometrics, Monetary Computing & Know-how, and Algorithmic & Quantitative Buying and selling. EPAT® equips you with the required talent units to construct a promising profession in algorithmic buying and selling. Enroll now!
Additional readings or subsequent blogs to learn:
Disclaimer: All knowledge and data offered on this article are for informational functions solely. QuantInsti® makes no representations as to accuracy, completeness, currentness, suitability, or validity of any info on this article and won’t be answerable for any errors, omissions, or delays on this info or any losses, accidents, or damages arising from its show or use. All info is offered on an as-is foundation..